Well, two agonizing weeks later, I have finally managed to get a ownCloud working with my NSS 6000 appliance. The hurdle? SELinux. SElinux was preventing me from writing data through ownCloud to the symbolic link to the NFS share. Once I turned it to permissive mode, it started working. I plan on turning it back on, but for now, it’s off.
Step 4b: Install missing PHP modules.
The following PHP modules are required for ownCloud.
yum install gd gd-devel php-gd php-intl php-xml php-mbstring
Step 5: Install PHPMYADMIN
PHPMYADMIN is not a part of the default repositories, so I found a tutorial to get this working.
http://www.cyberciti.biz/faq/centos-fedora-redhat-linux-installing-phpmyadmin-webtool/
The only exception is that rpm file is out of date. The update link is: http://download.fedoraproject.org/pub/epel/6/x86_64/epel-release-6-8.noarch.rpm
Otherwise the tutorial works great.
Step 6a: Install ownCloud
I tried using the Linux packages, but found that I couldn’t get them working. After serveral tries, I manually installed ownCloud. Mostly this was due to frustration from the NFS security problems, and it was just easier for me to do it manually.
cd /home/{username}/Downloads
wget http://download.owncloud.org/community/owncloud-5.0.3.tar.bz2
tar -xjf owncloud-5.0.3.tar.bz2
cd /owncloud
cp -r * /var/www/html
chown -R apache:apache /var/www/html
Step 6b: Create NFS symbolic link
Back in Step 3, I mounted my NFS share to /mnt/nfs/public. In this step, I create a symbolic link within the /var/www/html directory that points to /mnt/nfs/public
Create a separate directory on the NFS share and give the apache account ownership.
mkdir /mnt/nfs/public/owncloud
chown -R apache:apache /mnt/nfs/public/owncloud
Create the Symbolic link
cd /var/www/html
ln -s /mnt/nfs/public/owncloud data
Step 6c: Create mySQL database
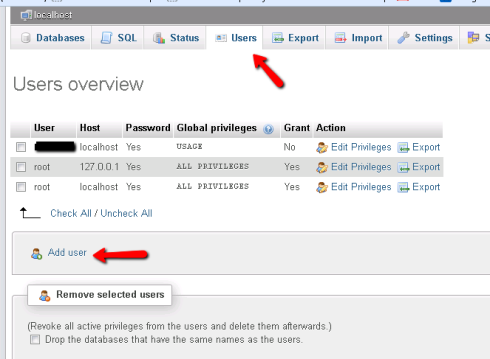
Open up PHPMYADMIN, and click on the Users Tab. Then click Add User.
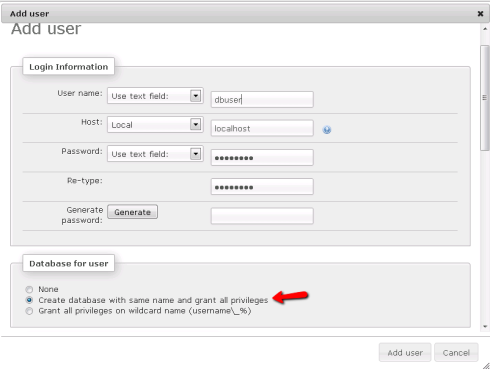
Enter in the database user, choose localhost, and enter a password. Next select “Create database with the same name and grant all privileges”. Click Add user.
Step 6d: Create Admin account and Configure Database
Now head to your URL http://server/, and you should see the ownCloud startup wizard. You will also see a couple of security warnings. A note about this in a bit.
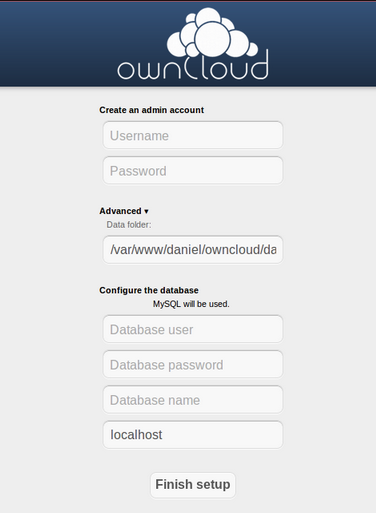
Enter a admin account name and password.
Click on the Advanced arrow to drop down the advanced options.
Edit the Data folder; In my case it was /www/var/html/data/owncloud (because I went through the setup first, I stole this screenshot from the web. Thanks Daniel whomever you are.).
In my case, there was also a button to switch to mySQL (not shown in screenshot).
Enter the details from step 6c.
Click Finish setup.
Congrats! ownCloud Achievement Unlocked! Create a few users and test away.
A quick note about a few things.
- The first is SELinux. I plan on turning this back on before I unleash my ownCloud to the net. It’s not something I am familiar with, so I’m sure it will take some time before I get it working.
- The PHP version installed is 5.3.3 and at when you first go to setup ownCloud from the web front end, the error “Your PHP version is vulnerable to the NULL Byte attack (CVE-2006-7243)
Please update your PHP installation to use ownCloud securely.” appears. I tried installing updated versions of PHP from various tutorials, but either they weren’t complete, were incorrect, or broke ownCloud. This is also something I mean to fix, but again will take some time for me to figure out.
- There is an iOS app. It costs $1. If this works, I have 700GB as opposed to 3GB of Dropbox. Well worth the cost, and hopefully that $1 goes to greater and greater innovation. Dropbox is a great product and I use the free storage for all my devices. There are just other things I would rather spend money on. Like my SWTOR subscription.
All in all, this was a fun/frustrating project that got me using way more Linux than I normally use. It was a challenge for me and I enjoyed working on it. One day I might be a Linux expert, but for now, it’s just Beginners mind.


